Auto Target
system
What is Auto-Targeting? Hi there! This guide has been prepared to teach you how to best utilize Auto-Targeting.
First, let’s go over the basics.
The whole concept of combat in Mabinogi starts with targeting the monster you would like to attack.
Targeting requires some practice, since monsters generally move quickly, and the game’s combat system is a bit different compared to other games.
This is where Auto-Targeting comes in. Once your character is locked-in on the Auto-Targeting mode, all you need to do is press Ctrl to automatically lock in on the monster you’d like to attack.
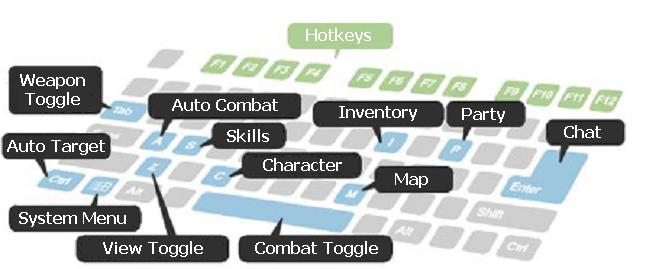
Below is a list of shortcut keys available in the game.
The Rules of Auto-Targeting
At first glance, Auto-Targeting may seem like an endless barrage of clicks with no rules, but it actually is governed by one simple rule.
[Rule] Auto-Targeting always targets the monster closest to the mouse cursor.
Simple, right? The images below should give you a much better idea of how this works.
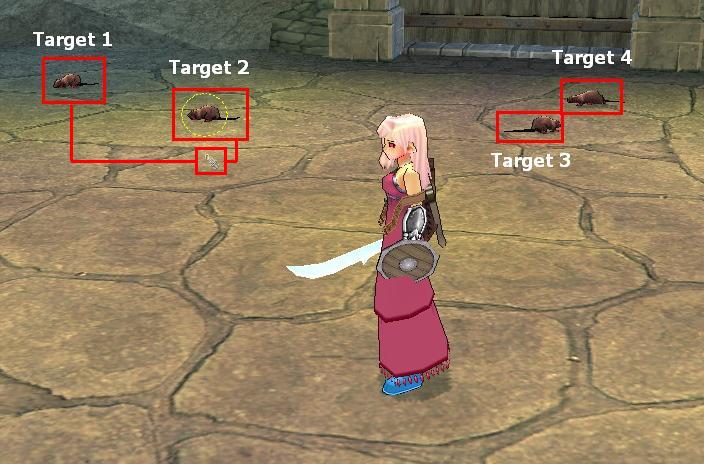
As you can see here, the sword-shaped cursor is closest to Target 1, then Target 2 < Target 3 < Target 4, which means the game will recognize [Target 1] as the closest foe.
When you press Ctrl right then and there, your character will automatically select Target 1 as the main target.
This does NOT mean you are automatically locked in to that target; rather, a dotted circle will cover the monster as if to ask, "would you like to attack this monster?"
The difference between Selecting a Target and Setting a Target is explained below.

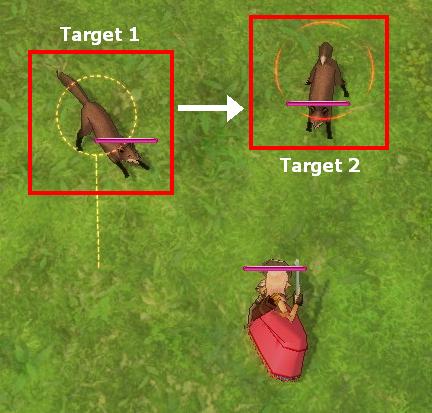
In [Image 1], you’re Selecting a Target, as if you are leading your aim to target that monster.
- The dotted circle is a clear indicator that the monster can potentially be your target.
[Image 2] show how to Set a Target, that is, locking into that one monster!
- This is when you can make your attack by pressing Ctrl.
Selecting a Target – A prelude to locking in on a specific target
Setting a Target – Locking-in on the selected target, and attacking that monster no matter where it is
One other important note: When you’re in the process of Selecting a Target, you have the option of changing your target, but once you have Set the Target, you may no longer use the Ctrl button to change the target to another monster.
Switching the target while on Auto-Target
At this point, you may be wondering how you can switch to another target when you are already automatically locked-in on another target.
This is when another shortcut key comes in handy.
Press either [Ctrl + Tab] or [Shift + Tab].
As mentioned above, you are locked in on Target 1, but you want to switch to Target 2. That’s when the shortcut keys come in.
(You will notice that the character is currently set on Target 1, and is trying to switch to Target 2 using the shortcut.)
After switching the target, click on your left mouse button to get locked-in to the other, new target.
This concludes the tutorial on how to effectively utilize Auto-Targeting. Hopefully this will help you achieve better results in your hunting! Enjoy.